Step stencil SMT successfully manages the solder paste volume deposit on a PCB for both large and small SMT components. However, a wide stencil and additional solder paste count a lot when selling large SMT components successfully. Also, because SMT components that are smaller need less solder, thin stencils perform better when applied.
Step-down Stencils
Step-down stencils are essential on PCBs with a mix of numerous large SMT components and a few small ones. The basic stencil for smaller SMT components is a steel sheet that is 0.15 mm thick and then thinned to 0.1 mm. The sheet’s reduced thickness produces concave layers on one side while staying flat on the PCB-facing side.
You can use step stencils with or without frames. Assembly workers use step stencils with frames in various production runs, although frameless step stencils are good for prototype assembly. The step stencils minus the frames are less expensive than step stencils with frames.
Step-up Stencils
Step-up stencils are helpful for Boards with several small SMT components, including a few large ones. The primary component of the stencil is a sheet of steel that is 0.1 mm thick; large SMT components require steel that is 0.15 mm thick. The higher thickness produces a convex layer on its fundamental sheet, which remains flat on the side facing your circuit board.
What are the two types of stencils?
There are various wide varieties of stencils. However, they may typically fall into two major groups based on their substance and design:
Cut-out stencils: To create these stencils, a flat piece of material, such as paper, plastic, or metal, is sliced out to reveal a design or pattern. The sections that we cut out constitute the negative space of the stencil, which may help to transfer the pattern onto a surface by painting or to spray over it. Depending on the material and the complexity of the design, cut-out stencils can be either reusable or disposable.
Positive stencils: To make these stencils, a positive image or pattern is first created on a flat surface, such as a screen or a stencil sheet, and then transferred the design to a surface. Positive stencils can consist of various materials, including metal or plastic for etching or engraving, silk or polyester for screen printing, or polyester or silk for embroidery. Next, the areas of the stencil that are not part of the design are blocked or covered to create a positive image, leaving the design itself exposed for transfer onto the surface.
All stencils have advantages and disadvantages, depending on the application and the intended effect. For example, Cut-out stencils are often simpler and more adaptable, as they can be used with various materials and readily changed or adjusted. On the other hand, positive stencils rely on a pre-made picture or pattern and are frequently created for a particular application, making them more exact and consistent.
Problems with stencils
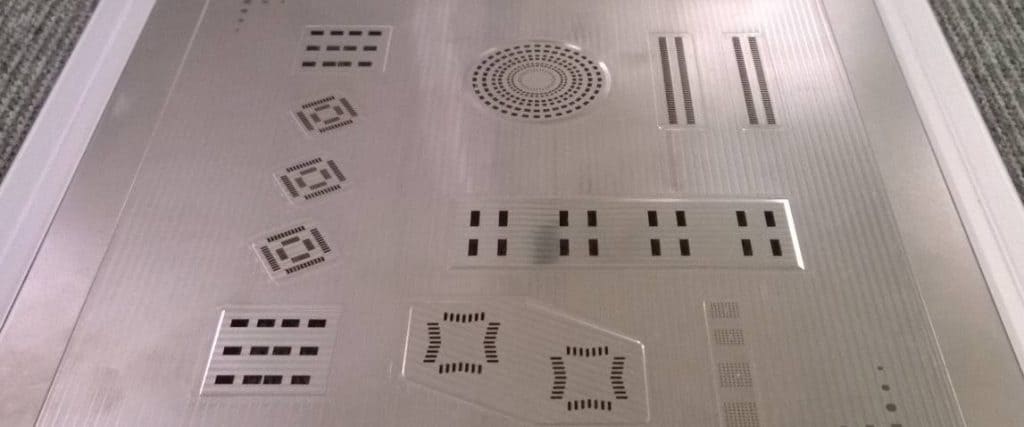
The amount of solder paste that the stencil deposits on the pad depends on the thickness of the stencil. Additionally, a critical factor is the size of the entrance or aperture for a pad. Although Rush PCB creates stencils with the ideal aperture and thickness for efficient solder deposit, they might not be sufficient for various SMT components with various footprints. For instance, we must print bigger volumes of solder paste on the CBGA pads because ceramic BGAs require a high melting temperature during the soldering process. Therefore, rush PCB suggests final electropolishing for the stencil for effective solder paste release.
Steps on making a stepped stencil

The right application of solder paste to the printed circuit board (PCB) is essential for ensuring component terminals sit correctly on the PCB pad to enable proper and reliable electrical connections during any PCBA surface mount assembly process. The majority of the time, we accomplish this technique by using a solder stencil. It consists of stainless steel and contains openings (apertures).
Stencil Technologies
The business uses five stencil technologies: laser-cut, chemically etched, plastic, electroformed, and hybrid. Combining chemical etching and laser cutting is a hybrid. Step and hybrid stencils can both benefit significantly from chemical etching.
Chemical Etching Process
Using two positive images, chemical milling helps to etch metal masks and the flexible metal mask stencils from both of the sides. This method results in etching that moves laterally and in the vertical direction. Undercutting is when we have larger openings than anticipated, resulting in an excess solder deposit. When 50/50 etching is complete from both of the sides, the wall is nearly straight and tapers slightly to an hourglass form in the middle.
Electropolishing, a micro-etching procedure, is one way to get a smooth wall since electro-etched stencil walls might not be smooth. Nickel plating is another method for creating side walls in your aperture that are smoother. However, the paste may roll over a flat or polished surface before the squeegee. However, it may also hop across the surface of the stencil. We can avoid this issue by polishing aperture walls and avoiding stencil surfaces. Further enhancing smoothness and the printing performance is the nickel plating element. It does, however, limit the opening of the aperture and necessitate artwork modification.
Laser cutting
Laser welding combines a laser cutting and laser welding process that produces a laser cut opening in the desired step-up or step-down area, and a stainless steel material with the requested thickness is laser welded with the same size. The welding seam spacing is approximately 200µm. you can easily adjust the squeegee to step depth or height without causing damage or abrading your squeegee blade.
The technology’s flexibility allows for step-down or step-up areas on both sides of the stencil, short delivery time, and high precision of the laser cutting and laser welding process. To produce true-to-size stencils, the laser cutting process is carried out in strained conditions to guarantee an aperture positioning of ±10µm and an aperture size accuracy of ±3µm.
Place the first layer on the following sheet of stencil material after cutting it out. It should be securely adhered to the second sheet using the adhesive. Next, cut off the second layer of the pattern using an X-Acto or craft knife.
The second layer should include the design portions visible in the second stencil step. Conversely, any design aspects revealed in the first stage should remain out of the second layer.
Repeat the Process

Repeat the procedure for each additional layer for fastening the first layer to the second one. Again, note which layer you are currently working on and the areas of the design you are removing as you work on each layer.
Keeping the stencil material tidy and free of any dirt or adhesive traces is crucial. This will assist in guaranteeing that the stencil layers fit together correctly and that the final design is sharp and tidy.
Clean the Stencil
It might be as simple as dampening the stencil designs with water and using a dish brush to scrub at medium pressure. While the water is running and you scrub, keep the stencil flat by setting it on a cutting board or cookie sheet.
If water isn’t cutting it, try spraying Krud Kutter on the stencil and scrubbing! This eco-friendly cleaner will undoubtedly remove dried paint.
We suggest a presoaking period for the more difficult-to-clean stencils! Spray any cleaner you see fit on the stencil, then lay it flat in a plastic trash bag for the night. Clean as previously advised after that.
Additionally, you can use the presoaking procedure for dried-out brushes as well!
Design Rules
We can improve paste transfer efficiency by laser-cut holes that we electroplate during manufacturing. The final aperture sizes determine the volume of solder paste that will be printed on the PCB. The height, or stencil thickness, will significantly impact the stencil’s performance and, in turn, the rate of product defects. The cad data quality conveyed, the manufacturing processes and technology utilized to make the stencil, and the usage circumstances all affect the stencil’s dimensions and printing positional precision.
The volume, homogeneity, and definition of the material deposited onto substrates depend on the size and shape of stencil apertures. Appropriate aperture sizes are determined using measurements like area ratio and aspect ratio. The area and aspect ratios must be more than 0.66 and 1.5, respectively, for appropriate paste release. In addition, competing surface tension forces during the printing process determine whether the solder paste will transfer to the printed pad or stay stuck to the walls of the stencil apertures. At these levels, the aperture walls’ finish can make a difference.
The main advantages of using a stencil

Using a stencil for different tasks like painting, printing, and etching has several benefits. The following are some of the main benefits of using a stencil:
Precision: Stencils are precise, and they can assist you in producing an accurate and dependable image or pattern. With a stencil, you can produce crisp edges and clear lines, which can be tough to achieve freehand.
Repetition: Stencils are great for making numerous copies of the same pattern or design. Once you’ve made a stencil, you can use it repeatedly to make exact replicas.
Speed: Using a stencil can save time compared to freehand drawing or painting. Instead of starting from scratch every time, you can quickly apply the stencil to the surface and paint or print the design.
Consistency: Using stencils can help ensure that your design or pattern is the same on various surfaces or construction materials. Consistency is crucial in branding and marketing materials. Thus this is particularly vital.
Versatility: Stencils can work on various materials, including paper, fabric, wood, and metal. They are flexible tools for various applications since they may be helpful with various materials.
Conclusion
While creating a stepped stencil can take some time, it can also be very rewarding. These procedures can help to make a detailed and intricate stencil that we can apply to several projects.


