Introduction
A keyboard PCB or printed circuit board is the physical platform that interconnects all the components in a computer keyboard. It plays a central role in transmitting key press inputs to the host computer. This article provides a comprehensive overview of keyboard PCB design, manufacturing, and functionality.
Keyboard PCB Basics
A keyboard PCB serves as the structural base to mount and connect the various components:
- Switch matrix – allows detecting key presses
- Microcontroller – scans matrix and sends key data
- Stabilizers – for larger keys like spacebar
- Additional chips – drives LEDs, RGB, macros etc.
- Connectors – interfaces with computer
- Components are soldered onto the PCB
The PCB is the backplane that routes signals between the microcontroller, switch matrix, and computer interface.
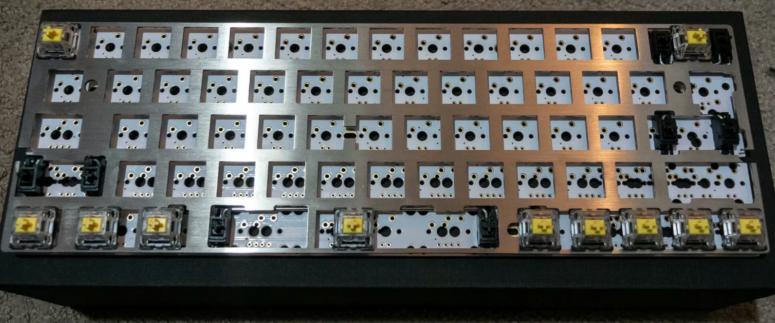
Fig 1. Fully assembled keyboard PCB
Design Considerations
Several factors go into keyboard PCB design:
Layout
- Matches physical keyboard and key layout
- Optimize trace routing to minimize length
Layers
- Simple keyboards can use single-sided boards
- Multi-layer (2+ layers) allows crossing traces
Switch Matrix
- Grid of traces to detect key presses
- Scanned by microcontroller firmware
Noise Reduction
- Careful grounding and shielding important
- Avoid crosstalk and interference
Stabilizer Mounts
- Support plate/PCB mounts for larger keys
RGB Lighting
- Traces and pads to support per-key LEDs
Manufacturing Process
Modern keyboard PCBs are fabricated using SMT assembly:
PCB Fabrication
- Generate from CAD tool and fabricate bare PCB
- Common materials are FR-4 or polyimide
Stencil Printing
- Solder paste stencil printed onto PCB
- Use machine to populate components onto paste
Reflow Soldering
- Heat to melt solder and attach components
Testing
- Electrical testing and functional checks
Assembly
- Add plate, connectors, case, keycaps etc.
Keyboard Switch Matrix
The switch matrix is core to a keyboard PCB’s operation:
- Grid of trace rows and columns
- Intersection points connect to switch terminals
- Microcontroller scans matrix rows/columns
- Detects closed circuit when key pressed
Allows detecting individual key presses without one trace per key.
Fig 2. Keyboard switch matrix using row and column traces
Integrated Circuits
Keyboard PCBs host a few key integrated circuits:
Microcontroller
- Scans switch matrix to detect key presses
- Popular options are Atmel ATmega328P or 32U4
USB Controller
- For USB interface, manages data transfer
- Such as V-USB or LUFA USB libraries on ATmega32U4
RGB Controller
- Drives individual RGB LEDs for backlighting
- Often uses Holtek HT68FB560 or similar LED driver
Other
- Support chips for macros, audio, OLED displays etc.
- Power regulation and reset control
Common Connectors
To interface with the host computer:
- USB – Most common today, supports both data and power
- PS/2 – Legacy round 6-pin connector
- RJ45 – For keyboards using parallel TTL interface
- Bluetooth – Wireless via Bluetooth LE
Additional Components

Besides the core PCB and switches, additional components are added:
- Case – Plastic enclosure for aesthetics and rigidity
- Plate – Metal plate to provide structure
- Keycaps – Individual plastic caps that mount on switches
- Cable – Connects keyboard to computer
- Lighting – LEDs for backlighting effects
Customization Options
Many customizations can be done:
- Switch types – MX, optical, low profile etc.
- Form factor – 60%, TKL, full size, ergonomic
- Wired or wireless
- RGB backlighting
- OLED screens
- Rotary encoders
- Macro/media keys
- Acrylic diffusers
- Aluminum cases
Allowing endless keyboard variations to suit any need or preference!
Applications
Keyboard PCBs are used in:
- Computer keyboards – for desktop, laptop, servers
- Peripherals – music, gaming, point of sale
- Smart devices – tablets, smart TVs, appliances
- Industrial controls and instrumentation
Modern keyboard PCB manufacturing enables cost effective, high quality, and customizable data input devices.
Pros and Cons
Advantages:
- Allows compact, thin keyboard designs
- Supports extensive customization
- High reliability with quality components
Disadvantages:
- Repairs often require full PCB replacement
- Custom PCBs involve high NRE costs
- Tight component spacing can limit modularity
Conclusion
In summary, a keyboard PCB provides the interconnect foundation for all components in a keyboard. Careful trace routing, switch matrix design, and noise control are required to ensure reliable performance. When combined with quality switches, firmware, and enclosures, keyboard PCBs enable the creation of high performance and customizable data input devices. The vast range of computer peripherals we use today are enabled by advanced PCB and electronic manufacturing capabilities.
FAQs
Q: What is the minimum number of layers required for a keyboard PCB?
A: Simple keyboard matrices can be implemented with a single PCB layer. 2-4 layers are more common for including ground planes or more complex routing.
Q: What interface is most modern keyboard PCBs designed for?
A: USB has become the standard keyboard interface supported on modern PCBs, replacing legacy PS/2 and serial interfaces.
Q: What is the role of diodes in a keyboard switch matrix?
A: Diodes prevent ghosting by blocking reverse currents when multiple keys are pressed simultaneously in a matrix.
Q: What is an example microcontroller used in keyboard PCBs?
A: Many keyboards use ATmega32U4 or ATmega328P from Microchip due to their built-in USB support and ample GPIO for matrix scanning.
Q: How are most keyboard PCBs fabricated and assembled?
A: The majority of keyboard PCB manufacturing utilizes SMT assembly with automated pick-and-place and reflow soldering for high volume production.
Definition of Keyboard PCB and Some of the Variants
Plate Mounted versus PCB Mounted Switches.
There are two mounting style types switches for mechanical keyboard: Plate mounted and PCB Mounted. Sorting out the distinction can be hard, so we’ll describe both switches more specific in this article. Plate-mounted switches only have 3 pins, in the other hand PCB-mounted switches have 5 pins. You can change PCB-mounted to fit with plate mounted switches by cutting the additional pins on the lower part of the switch. In this article, we’ll discuss entirely the contrast between these switches types and reveal to you how to adjust the switches to fit your board.

Fig. 1 PCB Mounted Switches vs Plate Mounted
The main difference between plate-mounted switch and PCB-mounted is the contact pins that they have. There are 3 pins on a plate-mounted switch, beside PCB-mounted has 5 pins.
PCB-Mounted Switch
Look closer at the bottom of PCB-mounted switches and you’ll find 5-pin switches in total. Those 5 pins are consist of two pins that is plastic based on the sides designed to give stability, two metal pins that make the switch working, and a “pin” at the center that looks more like an enormous round handle. By soldering the switches, it can be install to the PCB, and performing a simple mount as shown below.

Fig. 2 PCB-Mounted Switches Illustration
As for PCB-mounted switches, it also has guiding pins to help mount the switch on the PCB. Commonly, this kind of assembly has a lighter vibe, and the keys will might spring back a bit more. This mounting mostly utilized in a small size keyboard as they will need less construction to hold and have less flexibility. Nonetheless, in the current board, having a plate is extremely normal. It is feasible to decide to assemble a keyboard which do not have a plate, soldering quality will determine the switch stability.
Plate Mounted Switch .The fact that these switches require a plate hence it is called Plate-mounted switches. Only 3 pins exist on the base: the center round knob and the two metal pins. It is designed with the plate because they do not have the stabilization pins. Each switch will be stabilized by the plate and decrease side-to-side staggering no matter when the key is pushed down (as demonstrated beneath).

Plate Mounting vs PCB-Mounting
As for Plate-mounting, it needs to install the switches with a metal plate which is located over the PCB. Then soldered the switches to the PCB after it is installed in the metal plate then. The plate permits the keyboard to become more fortified and stable with more tough feel. These are regularly utilized in a larger keyboard to offer more support because of the large size, the keyboard will flex more. To keep everything better construction the plate likewise adds greater sturdiness to the keyboard.
One major distinction of Plate-mounted switches from PCB mounted style is they do not need extra guiding pins since they are mounted into the plate rather than to the PCB. Simply remember, the plate will be hard to take off when soldering the switches,. You should take it off to remove the plate and solder it back to the PCB. This probably won’t be the good, if you want to make bunches of adjustment and changes. Generally, the plate-mounted is having high durability and higher grade. A few people like the sensation of this way of mounting since it changes the keysto be more steady and less rough. Simply remember this design is ordinarily more costly because of the additional parts and assembly.
3-Pin vs 5-Pin Switches.
Think a more deep at 5-pin and 3-pin switches, each switch isn’t better than the other. Even so, if you use switches without a plate, at that point there is less bolster for your switches. Because of the absence of support, the keyboard will feel shakier and less steady. By the chance you are type of heavy-handed keyboard user or you like of experience of a steady keyboard, you might need to utilized a plate on your keyboard.
In general, the PCB-mounted style doesn’t need an extra support plate that’s why it is cheaper and easier to build. In numerous hot-swappable board, they uphold essentially 3-pin switches. With 3-pin switches, it might be useful in such a term. In case you are making a customized keyboard, this is carefree since you can determine and pick out what PCB you are utilizing. Regardless you purchase 5-pin switches but you need to place them into a 3-pin pcb, it is not difficult to make them suitable.
As we have discussed previously, the major distinction between 3-pin and 5-pin is total pins that standing out. You can cut the two plastic pins on side with either fingernail skin cutters, tissue cutters, nail trimmers, or other regular tools you may have around the house,.
What is Keyboard Plate means? The plate is used over of the PCB for additional help, this keeps the keyboard more steady and from flexing. Commonly this part is not owned in every keyboard. This is the fundamental distinction between the two switch mounted, regardless of they have this plate or not.

Fig. 4 Keyboard Plate Illustration
Diverse Plate Materials. The common materials for plate materials are found in the following list below. There are often new materials being tried as plates, so noted that this is not an fix list. Numerous customized mechanical keyboard, after they are bought, set up the plate documents on the web. This is for individuals who need to print or produce in CNC their plates to utilize on their keyboard. Aluminum and brass are the two most used materials for plates. Other than those two, it is depend on the client to determine materials and constructs their own. Even though there are diverse plate materials, giving them a shot and finding which material which suitable for you is the best method. The various case of materials and switches will also influence the general keyboard’s feel and sound.
- Plates from aluminum are the most well-known and used on a custom keyboard. It is broadly accessible and not difficult to cut. Aluminum gives a solid plate that has no bend in the keyboard. This material is a tolerably solid.
- Brass is more solidthan aluminum. Gradually, without being dealt with, brass will stain and oxidize after some time. A few people have seen that brass is noisy and bassy. Nevertheless, the other have seen minimum contrast between brass and aluminum.
- One of plastic based material used as plate material is Polycarbonate. Nonetheless, it is bassy. Polycarbonate feel bouncy on the PCB and permit bend.
- Carbon Fiber. Lightweight and exceptionally additionally tough is carbon fiber characteristics. It permits bendwhen gaming/typing, which gives a bouncy vibe.
In this guide, we have known all differences between PCB-mounted and plate-mounted Switches. The major difference is the pins quantity on the lower part of switches, regardless of whether they are 3-pin or 5-pin. The pins quantity doesn’t have a significant effect, still, the fact that you can basically cut or clip off the additional plastic based pins if your PCB just suitable for the 3-pin mounting. We additionally described the advantages of making a keyboard with a PCB mounting and plate system, for example, contrasts in solidness, feel, and quality. There are a few kind of PCB’s out there that all serve an uncommon features and typing experience, which truly indicate that this is intriguing leisure activity. Following are a few keyboard variations hat you need to know.
- Mechanical Keyboard
Commonly, all modest computer users may assume that all keyboards are equivalent. As they might believe that after all computer users may just type a couple of messages and play out a couple of searching on internet through a day. Nevertheless, choosing a keyboard for the hardcore gamer is on another level, it is very crucial. Having the correct keyboard is about tactual feedback and feel. It is about enhancing gaming experience (and general computing) to the next level. All this about is choosing a keyboard that feels directly in your grasp, which empowers you to reach your best performance. There are two keyboards core types, mechanical keyboards and membrane keyboards. Choosing which type is proper for you rely on a few factors. All things are considered, you may have spent a lot of money and endless hours exploring the best PC parts to purchase. it pays to consider how you will be communicating with your new build as well!

Fig. 5 Illustration of Mechanical Keyboard
The main difference between mechanical and membrane keyboards. The more common keyboards are Membrane keyboards.Thin membrane pushes on a circuit layer, that enrolls the button pressed in membrane keyboards. Compare with a mechanical keyboard, membrane keyboards are less expensive, handy, calm and lighter. Hence, membrane keyboards have weaknesses such are a more limited lifespan, inclination towards a “soft” key feel, just as hard to clean. The last is the incapability to let “key rollover”. Therefore you can just really enlist one keystroke in one time with a membrane keyboard. This implies you shall find the key you push does not enlist. Regardless of whether you are typing or gaming, this can be a big drawback.
Mechanical keyboards are prominent for their particular key-feel. Mechanical keyboards give significant feedback to user. A mechanical keyboard has spring-loaded switches instead of a membrane cap that pushes down on a narrow membrane layer, to a conductive circuit below. These register the key squeezed – frequently with a distinct snap, unique to a mechanical keyboard. An unusual component is their spring-loaded switches – these come in a few distinct feels. The fundamental trinity of switch types are clicky, that give crisp feedback feel; tactile, where a knock in movement gives feedback; or linear, which the keystroke is subtle;. Two or three lesser switch types are quiet, which switch makes insignificant aural feedback, and the speedy, where the key activates as fast as could be expected. Switches can likewise be found in the low profile design that makes key’s travel shorter and thinner keyboard . As of late, there have been a few advances in the key innovation. Razer has made optical switches with low actuation times utilizing a light beam underneath the switch stem. Steelseries’ reaction is their OmniPoint switch that can be arranged to perform at various actuation points.
The other key distinction between the membrane and mechanical keyboards is customization. Mechanical keyboards permit you to alter the keycaps – hence profoundly changing the feel and appearance of your keyboard. On the web, there is no lack of keycaps, which you can modify your keyboard like what you want. If you have an intention to modify keycaps, we display the photographs from our Mechanical Keyboard Mini-meet in display area for your inspiration. Key drawbacks of a mechanical keyboard include sound, weight, and cost. In case you are bothered by the noise, you might need to move from most mechanical switch types and select a silent one. Whereas the various choices of switch design give great feedback, it makes the keyboard’s sound louder than its membrane set, heavier, and costly.
What aspect that we must concern in when purchasing a keyboard. There are a few important points when buying a keyboard. These include the type of utilization, compactness, just as plain personal preference. The sort of Personal Computer activity you might be doing will be consideration to what kind of keyboard you will purchase. In case that you are seldom using PC, moving around a lot, or enjoy playing light games a membrane keyboard might be more appropriate. Are you using PC in almost entire day? Or on the other hand, you are searching for uncommon and special to complete your build with?
Mechanical keyboard will be a good option for you. If you searching for a keyboard that permits you to alter the look at feel of board, or that gives tactile feedback, a mechanical keyboard might be ideal for you. Mechanical keyboard shall raise your gaming experience – improving your build speed in Fortnite, or not any more passed spells in Dota. It additionally consider the keyboard size. If you utilize your PC for a combination of data entry and gaming, a full-size keyboard, with complete Numpad is good option. However, if you utilize your console just to game, a TKL (tenkeyless) design might be more reasonable. Also, if space is at a higher cost than a normal or premium, more compact keyboard, consider smaller one. Membrane keyboards commonly are full-sized, while you can purchase mechanical keyboards in both standard sizes.

Conclusion. A keyboard is associate with PC. However, the two types of keyboards have their favorable pros and cons. At the point when you go to your nearby PC shop, think carefully about the contrasts among mechanical and membrane keyboards. You need to ensure that it appropriately fills your need.
- Hot-Swappable Keyboards
Hotswap (can be written hot swap or hot-swa) is an stated attribute that Input Club and Kono Store used early. It depicts keyboards that permit switch substitution without soldering process. Kaihua or Kailh, the first switch producer in China, made the market-overwhelming hot-swap socket design presented below.

Fig. 6 Illustration of hot swappable keyboards
Numerous web site says that hotswap keyboards is built from “hotswap switches,” which is infrequently the case and can create light hesitation. Cherry MX-style switches hotswap keyboards are applicable for keyboards with equivalent hotswap socket plate design/pinout, however they explicitly were not intended for hot swap utilization. Those switches could be soldered / mounted into a standard keyboard. The genuine development lives on the PCB or, if there are real hotswap switches same as our contactless Keystone line / SILO, in the fundamental innovation.
What are the advantages? Hotswap keyboards are quality-oriented manufacturers and liked by typists. They make switch fixes simple (bringing a longer lifetime to keyboard) and take into personalization, yet those are only the base advantages. The simplicity of assembly also makes production in small quantity possibly runs — manufacturers can use extraordinary switches but they can get a lower Minimum Order Quantity, evading huge automation expenditures. On the chance that a keyboard does not own hotswap sockets, its adjustment alternatives are exceptionally limited. In the standard keyboard, you should add Holtites socket and / or solder to alter switches. Holtites sockets are not excessively solid and can just handle with a couple of switch alteration. Those problems vanish with advance hotswap socket designs such as Kaihua’s.
For some reason, Why are not many hotswap keyboards available? The main explanation is profit decrement — both short and long term. Hotswap sockets only change the expenditure a little per keyboard. Most keyboards are inconceivably low cost to make, and created in batches of a few thousand, so companies do not want additional expense which can reduce margin. They additionally make repairs simpler; when switches are broken, people are considerably less likely to purchase another keyboard instead of recover it themselves. Hotswap sockets additionally need some engineering expertise to perform. They occupy an additional space over the PCB so component routing and placement should be exact. This limit worldwide format support on the PCB level, particularly if the keyboard is equipped with LEDs. If you require a split space bar that belongs to a hotswap keyboard or a European enter key, distinct PCB design is generally essential. Keyboards similar to Minivan, which is not, at this point accessible, accomplish incomplete success complete keyboard functionality by decreasing LED functionality.
Conclusion. If you familiar with soldering and have an favorite keyboards switch, hotswap probably won’t be important for you (regardless of whether it offers the quality of lifetime improvement). For people who prefer simple assortment and repairs, nonetheless, hotswap keyboards are great. It is difficult to confirm making something besides hot-swap keyboard as a special keyboard producer; expect to see an increasing number of mechanical keyboards build from hotswap choices available on the market for the following year.
Keyboard PCB Design Tutorial
Electronic design. It can be described that mechanical design is another half of electrical design. All the key pushes should some way or another be transferred to the PC. I have never build anything associated with USB or designed electronics system for a keyboard usage before, at the same time, similar to all tasks in this project this appeared to be a great challenge. Each keyboard has its own controller. This processor do several things such as reads the keys, makes an interpretation of read keys to messages that key is pressed, and delivers and deliver messages to the PC. Most of current keyboards use USB connection. The PC only sees a common USB device. This keyboard and some other USB keyboard are just the same. ATMega328P is used as main controller unit for this keyboard. The processor is associated with the key switches and to the PC on the opposite side. Because the controller has no USB port this is copied in firmware with USB. On this prototype, you can see isp header, the processor, I²C connector, 12MHz crystal, programmer, and debug led. There are a few more components on the base.

Fig. 7 The processor using on the prototype board
There are a ton of keys using on a keyboard. Associating all keys straightforwardly to the controller might require a ton of input pins and plenty of wires. Fortunately, there are alternative methods to connect all of those keys. The most widely used technique is multiplexing . All of key switches are connected into a huge network. The controller drives single row at that point and reads all columns for checking whether a switch is pushed on the crisscrossing of that particular column and row. You might find some troubles when more than one key is pressed without a moment’s delay, while this works fine when a key is pressed at one time. The issue is that for a certain mix of keys, sometimes it is read by controller like some different keys are pressed too. People use term ‘ghosting’ for describe this situation. In many keyboards, the row and columns are spreading over the board so that ghosting rarely occurs. A solution to fix this issue could be to add more electronic components. If you add a series diode with each key switch, the ghosting issue might be solved. Sadly the Tipro MID128 keyboard that is used for testing the key format has a ton of noticeable ghosting. Indeed, it shows up so frequently and you can get truly tired of it. Afterward, there is a little improvement that can be done, it must be settled in the design. Due to irritating ghosting issues using the Tipro keyboard, I needed to ensure my design should not have this issue.
There are few alternative approaches to read every single key switch. I decide to utilize I/O expanders for this keyboard. I/O or Input Output expanders have a ton of pins and are associated with the processor through a straightforward 2 wire communication bus. Each expander serves 16 additional pins. So every switch is straightforwardly associated with I/O expanders. General I/O expanders are thusly associated with the processor and this tackled the pin count issue. This methodology is like utilizing shift registers, yet has some more benefits. Microchip MCP23017 is utilized as I/O expanders components, with 16 I/O pins each and internal pull-up. General I/O expanders are associated to the PC via I²C connection. Each I/O expander is configured to a different address and can be called individually.
PCB Design. While you can wired everything inside the keyboard one by one, a more professional and elegant solution is making PCB. This flawlessly interfaces everything and when all the key are assembled, the board likewise adds to the general firmness of the construction. Designing PCB is not excessively different from designing the case. You have to know where all things goes mechanically and afterward make the electrical associations. I used gEDA PCB For this project, one of the GPL’d suit. gEDA PCB is not difficult to use. It probably won’t be as sophisticated as a few of the commercial software, however, it is open-source, and with no limiter. I utilized this software before for a few different tasks (like the tikkenteller, a telephone cost enrollment system) so I use this software again.

Fig. 8 Screenshot of gEDA PCB
Since the keyboard comprises of two parts, we need one circuit boards for each hand. The two parts of the keyboard case are mirror in display, so I contemplated whether it is feasible to make a reverse printed circuit board version, to utilize the same design for the two parts only mirror it. This could not just reduce production expense for PCB (numerous duplicates of a solitary design is normally less expensive than multiple different designs with a single duplicate each), however, be a challenge for design also. The keyboard case is minimized and the greater part of PCB is now filled up with key switches, and it is only limited free space for the other components on the PCB. Utilizing surface mounted components giving an advantage to make wider free space. Shockingly this was used by general I/O expanders. Space for processor is not available. Then the controller unit moved to a different PCB. Since there are 4 wires required between the controller unit board and the half of keyboard (sck, sda, vcc, and gnd) this isn’t a very remarkable issue. Perhaps I will merge the processor in a next version.
All surface mount components require to be at the PCB lower part to be able to genuinely fit the Printed Circuit Board into the case. Top layer PCB is very full. Only the PCB lower part of half keyboard might be the PCB top layer for another half. So I made footprints for all surface mound parts on both lower and upper layer of the PCB. It is enough to make one design for this purpose. There is a slight distinction among upper and lower footprints. Each I/O expander requires to have different I²C address, then the processor can call them separately. The address is configured by giving 3 input pins on general I/O expander either high voltage or low voltage. The top layer I/O expanders are configured to one address, furthermore the ‘base’ I/O expanders are configured to another. Another base/top issue key switches footprint are not asymmetric. The pin on the pin on the left-hand side sits nearer aside and the right-hand side of the switch locates nearer to the top. In result I made a unique twofold sided Cherry MX on the PCB design software. In this form, holes are served for both top and base mount. The other challenge was some of measurement used in PCB are in imperial, however, the rest is metric. For example, the switch dimensions are in inches while the case dimensions and the free space between key switches are in millimeters.
I considered something simpler (and considerably less expensive) than producing and designing a PCB for the processor. I would propose one of the less expensive USBASP boards on eBay. Those are gadgets meant to be utilized as AVR firmware programmers. There is a processor, voltage regulator, crystal, USB interface, headers, led, and a all of various things I prefer to have on the board processor. The USBASP is less expensive on eBay than purchasing parts by parts, not to mention having another PCB made. I’d simply reconnect a few pins and upload my firmware.
PCB Production. After the PCB design was completed, I needed to get the real PCBs. I have home made some PCBs utilizing toner transfer. Print PCB design on a special sheet with laser printer. At that point, utilized clothes iron, transfer toner to PCB material from the paper. In the case of everything works out, you will get the design printed on the PCB raw material. This way worked previously, however this time was different. I made a few endeavors with various printers, various kinds of paper, and various types of PCB, yet nothing get done. At last, I surrendered and, produced it in online vendor.
There are numerous places to print and make PCBs. Some are high grade, some are quick, some are less cost, some are not. When you produce it in China you can save money on production costs, yet it may probably won’t be the best grade and longer time to finish. Saving expenses would be good, however more necessary for me is that PCB or other components is delivered with honor for the environment and the worker. Chinese PCB manufacturers prefer reducing expenses by giving low payment to their workers and unloading synthetic waste in the environment. I would preferably spend more on a PCB over permitting this to proceed. With a several comparison and looking I settled on Jackaltac. Their PCBs are made in the UK.
More Helpful Resources:
How to DIY My Own Keyboard
Brand like Razer, HyperX, Corsair, and so on, take the greater part of the spotlight in mechanical keyboard market. Most of these brands guarantee to offer the best functionality and quality, however, that is not generally the case. While the famous gaming brands have driven the reception and awareness of mechanical keyboards become the standard, make a deal on quality are quite often made to bring down costs. At the point when you look at your choices, the difference which will you find is only on the outward design. Pick your switch, pick your design—that is all.

Fig. 9 Illustration of mechanical keyboard
Yet, imagine a scenario in which I revealed to you that all aspects on the a keyboard can be arranged and customized. This goes a long way beyond only purchasing the most recent keyset from Massdrop or trading in an weaved connection. With pre-assembled boards, you do not get to pick the layout or size. When you need a programmable keyboard with 60 percent layout and having devoted arrow keys yet it is just accessible without the programmability, at that point you should make a deal and pick the features that are generally imperative to you. In case you do not want to compromise it, it will be good to assemble your own keyboard.
If you are wanting to do any DIY project, it is important for you to understand which components you have to purchase. The exact thing you need is working with soldering tool just to know you are missing a principal parts. There are six parts you will have to assemble to make a keyboard alongside a USB link: Enclosure, Keycaps , Key Switches, Mounting Plate, PCB, Stabilizers,.
All of parts have a wide scope of alternatives to customize your keyboard and numerous choices for one part can affect or restrict your choices for another. Picking the correct shop to purchase your parts can be quite troublesome if you’ve never make a keyboard. Your first sense may be to jump onto Amazon and begin looking for parts. You can figure out some great choices however it’s a lot simpler if you can get different parts from a same shop.
There are a some of various stores I often purchase my components. KBDfans has an enormous parts and they convey a larger number of PCBs and enclosures than any shop that I know. It’s completely feasible to get all components you require from them, yet their keycap selection comes up short. The other one-stop shopping place for mechanical keyboards components is 1UP Keyboards. Their case is not as strong as KBDfans yet if you are in US, you may reduce cost on shipping by buying from them. In case you’re searching for standard keysets, both of these stores will be enough.
Assuming, as if you are searching for something more extraordinary and with a more extensive compatibility, you will have to find it in the other supplier. Massdrop is an incredible place to get more costly and limited keysets at notable savings in case you are patient enough to sit tight for drop and ship process. In case you do not want to wait and ready to pay more, Originative gives various keysets from high-grade brands like Signature Plastics and GMK. Presently, before you spend money on everything without exception, we will talk more deep for each part so you can understand how they work together.
When you have arranged a workspace far from flammable items, you can begin assembling everything. The essential process resembles this:
– Press stabilizers to the PCB if it is required
– Soldered in switches after align your plate
– Secure the entire assembly into the enclosure
– Mount all keycaps
There are not many improvement you can perform to make it simpler. The absolute thing is to guarantee you follow work step by step. Your stabilizers can not be mounted over on the upper plate section and your switches can not be mounted under it, except if you ought to do extra work with solder sucker.
Stabilizers Installation. Stabilizers installation is quite easy. Adjust the prongs to the proper holes in the Printed Circuit Board and push them in. The direction, though, is important.

Fig. 10 Installing stabilizer on keyboard PCB
The plain with the stabilizers need go assemble in the bigger PCB holes meanwhile the ends with clips must be mounted on the smaller holes. When you mount them in different way, they won’t remain in. The first thing you need to do is getting it to the huge holes and afterward push the opposite and mounting the stabilizers to the smaller holes. You may need to apply right pressure to make the clips to near one to another. It ought to be noticed that stabilizers are not cover with grease from the producer before start soldering it. This implies they can be somewhat noisy, yet can be eased by applying a little grease to the connection points. WASD sells silicone-based grease for two or three dollars.
Adjust and Solder. It is difficult to keep the keyboard plate lined up with the PCB if you are attempting to put all switches in one time. For an ideal arrangement and to maintain the plate level, at first mount and solder the 4 corner switches. You can assemble the base row and test keycaps. The base row normally has numerous switch placement choices to oblige unique space bar and modification. It will be good to check the fitment and solder one switch than to desolder a whole row.
Fig. 11 Align and solder keyboard PCB
Before soldering components, ensure your soldering iron temperature is enough, and remember to clean the tip. Applying a little solder to the tip raises conductivity and soldering become quicker which will secure your board. Each solder joint might require close to two or three seconds. Try not to keep the tip squeezed the pad for more than that. it can make the pad broken and lift from the board. Clean the tip with a sponge and afterward tin on the clean surface.
Right, when you are tinning, it is the exact time you ought to be touching the solder tip (on soldering iron) to the solder. For a solid solder joint, heat the switch terminal and pad while provide tin to solder from the other side. Your solder have a synthetic cleaning chemical named flux which can’t tackle its work if it never contacts with the soldering surface. A decent solder joint will have a pleasant shine and not bubble.
Last Assembly and Keycap Mounting. The last assembly process ought to be very simple if you have used a screwdriver previously. Ideally, you have left the small screws for securing the PCB to somewhere protected as yet—they simply get lost .
Place the assembled board to the enclosure and keep the screws save. Commonly, it may have 5 mounting points yet your PCB may have four. This is okay, four screws will be enough to hold the entire board. The final activity is installing or mounting your keycaps. Press each keycap to the stems of all switches and you’re finished. If you follow this guide, you willl get extraordinary, just for you, to your specifications and appetite.

Fig. 12 Result example of DIY keyboard


